Connecting AI to your tools is easy. Doing it securely is the challenge
- Introduction
- OAuth 2.0 Concepts: Dynamic Client Registration and Token Exchange
- The Keycloak Setup
- The MCP Server Setup
- The Temperature Resource Server
- Testing the Setup
- Conclusion
- Extra
Introduction#
The Model Context Protocol (MCP) has quickly become essential infrastructure for connecting AI systems to enterprise data and tools. With Anthropic, OpenAI, and numerous development platforms now supporting MCP, securing these servers isn’t just recommended. It’s necessary.
This guide walks through securing a Spring Boot MCP server using Keycloak, an open-source identity and access management solution that implements OAuth 2.0 and OpenID Connect (OIDC). I’ll combine Spring Security’s OAuth 2.0 Resource Server capabilities with two advanced patterns: Dynamic Client Registration (DCR) and Token Exchange. Together, these create a robust, scalable security architecture for MCP deployments.
Why these patterns? Dynamic Client Registration lets MCP clients register themselves programmatically. No manual configuration is needed, which is particularly valuable in multi-tenant or dynamic environments. Token Exchange enables your MCP server to obtain service-specific tokens because it’s important that each service receives a token specifically issued for it.
To demonstrate these concepts, I’ll build a simple example: an MCP server that reports temperature readings. The architecture requires two components. The MCP server itself and a resource server that provides the actual temperature data.
OAuth 2.0 Concepts: Dynamic Client Registration and Token Exchange#
Before diving into the implementation, it’s important to understand two powerful OAuth 2.0 extensions that are particularly valuable for securing MCP servers:
Dynamic Client Registration (DCR)#
Traditional OAuth 2.0 requires administrators to manually register each client application in the authorization server. Configuring client ids, client secrets, redirect uri and scopes. This works fine for a handful of known applications, but becomes a bottleneck when clients need to onboard dynamically.
Dynamic Client Registration, defined in RFC 7591, solves this by allowing clients to register themselves programmatically. A client sends a registration request to the authorization server’s registration endpoint and receives credentials in response.
How it looks in practice: The client sends a POST request to the registration endpoint with the following payload:
{
  "redirect_uris": [
    "https://claude.ai/api/mcp/auth_callback"
  ],
  "token_endpoint_auth_method": "client_secret_post",
  "grant_types": [
    "authorization_code",
    "refresh_token"
  ],
  "response_types": [
    "code"
  ],
  "scope": "service_account email acr openid offline_access phone profile address web-origins basic organization microprofile-jwt roles",
  "client_name": "Claude"
}
And receives a response like this:
{
  "redirect_uris": [
    "https://claude.ai/api/mcp/auth_callback"
  ],
  "token_endpoint_auth_method": "client_secret_basic",
  "grant_types": [
    "authorization_code",
    "refresh_token"
  ],
  "response_types": [
    "code",
    "none"
  ],
  "client_id": "f30db58d-0487-4303-80ac-31c0c0d3f8d0",
  "client_secret": "BU4b1BLGbEbjG99JHFq6rKAuXlqa4byE",
  "client_name": "Claude",
  "scope": "service_account web-origins acr address phone openid offline_access organization profile roles microprofile-jwt email",
  "subject_type": "public",
  "request_uris": [],
  "tls_client_certificate_bound_access_tokens": false,
  "dpop_bound_access_tokens": false,
  "post_logout_redirect_uris": [
    "https://claude.ai/api/mcp/auth_callback"
  ],
  "client_id_issued_at": 1770843568,
  "client_secret_expires_at": 0,
  "registration_client_uri": "https://04f7-81-240-46-212.ngrok-free.app/keycloak/realms/demo-mcp-servers/clients-registrations/openid-connect/f30db58d-0487-4303-80ac-31c0c0d3f8d0",
  "registration_access_token": "eyJhbGciOiJIUzUxMiIsInR5cCIgOiAiSldUIiwia2lkIiA6ICJlNTVmZmQzYy00ZmY3LTQ2MGMtODNkNy1kYmRhYzU1ZGI1NDIifQ.eyJleHAiOjAsImlhdCI6MTc3MDg0MzU2OCwianRpIjoiMzdkYzYyMTQtMjYzMy05YmFmLTliODMtNzE3MmEzNDc5MWQ0IiwiaXNzIjoiaHR0cHM6Ly8wNGY3LTgxLTI0MC00Ni0yMTIubmdyb2stZnJlZS5hcHAva2V5Y2xvYWsvcmVhbG1zL2RlbW8tbWNwLXNlcnZlcnMiLCJhdWQiOiJodHRwczovLzA0ZjctODEtMjQwLTQ2LTIxMi5uZ3Jvay1mcmVlLmFwcC9rZXljbG9hay9yZWFsbXMvZGVtby1tY3Atc2VydmVycyIsInR5cCI6IlJlZ2lzdHJhdGlvbkFjY2Vzc1Rva2VuIiwicmVnaXN0cmF0aW9uX2F1dGgiOiJhbm9ueW1vdXMiLCJhbGxvd2VkLW9yaWdpbnMiOltdfQ.HRLF3YiY_uvDGsBc1tW9Mb5XnfSJcQd9ZOo4S6exeXQ2NvzbU265_OG6FTKqlCFNDdpMb4CWxkCBRiNun_veog",
  "backchannel_logout_session_required": false,
  "require_pushed_authorization_requests": false,
  "frontchannel_logout_session_required": false
}
Token Exchange#
Token Exchange (RFC 8693) allows clients to exchange one token for another. This is particularly useful in Spring Boot MCP architectures where your MCP server needs to call downstream services on behalf of a user.
Keycloak supports different types of token exchange:
- Internal-to-Internal: Exchange a token for a new one within the same realm (e.g., to change scopes or audience)
- Internal-to-External: Exchange a token for one issued by a different realm or external identity provider
- External-to-Internal: Exchange an external token for one issued by the current realm
It’s important that each service receives a token specifically issued for it.
To demonstrate this, I’ll use curl to exchange a token using the internal-to-external token exchange flow.
curl --request POST \
  --url https://04f7-81-240-46-212.ngrok-free.app/keycloak/realms/demo-mcp-servers/protocol/openid-connect/token \
  --header 'content-type: application/x-www-form-urlencoded' \
  --data grant_type=urn:ietf:params:oauth:grant-type:token-exchange \
  --data subject_token_type=urn:ietf:params:oauth:token-type:access_token \
  --data requested_token_type=urn:ietf:params:oauth:token-type:access_token \
  --data client_id=token-exchange \
  --data client_secret=e37af147-ebef-4723-be20-0ba92bc25b08 \
  --data requested_issuer=demo-users \
  --data subject_token=eyJhbGciOiJSUzI1SmJXWW1zc3Z3In0.**.fuf9AWEdTQXTKR9QZyb3axns2u9RXukr0-Y2O_X0K3Ogp3MbESEly93RuHQ_lM17-rTHPg
The response contains a new access token issued by demo-users:
{
  "access_token": "eyJhbGciOiJSUzI1NiIsInR5cCIgOiAiSldUIiwia2lkIiA6ICJaQm5TUXA1VXdvYW9xcXUybDdpZTZOM3NwVXE2Q2dMM3VrcHFzR1p0Mm9jIn0.eyJleHAiOjE3NzA4NDExMzksImlhdCI6MTc3MDg0MDgzOSwiYXV0aF90aW1lIjoxNzcwODM4MDU4LCJqdGkiOiJvbnJ0cnQ6YTA5NTJjN2EtMjcwNC00ZmE5LWU0ZDYtODc5MzU5Mzc5NDA3IiwiaXNzIjoiaHR0cHM6Ly8wNGY3LTgxLTI0MC00Ni0yMTIubmdyb2stZnJlZS5hcHAva2V5Y2xvYWsvcmVhbG1zL2RlbW8tdXNlcnMiLCJhdWQiOlsidGVtcGVyYXR1cmVfcmVzb3VyY2Vfc2VydmVyIiwiYWNjb3VudCJdLCJzdWIiOiJlNDVjZWE5MC1mZDcyLTQ5NTUtYWQ2Ny0zNDM5YzI3YmY2YjYiLCJ0eXAiOiJCZWFyZXIiLCJhenAiOiJtY3Atc2VydmVyLXJlYWxtLWJyb2tlciIsInNpZCI6Ik5YM0xoanZRejdyU3B0WTRjMHlJZTdqRCIsImFjciI6IjAiLCJyZWFsbV9hY2Nlc3MiOnsicm9sZXMiOlsiZGVmYXVsdC1yb2xlcy1kZW1vLXVzZXJzIiwib2ZmbGluZV9hY2Nlc3MiLCJ1bWFfYXV0aG9yaXphdGlvbiJdfSwicmVzb3VyY2VfYWNjZXNzIjp7ImFjY291bnQiOnsicm9sZXMiOlsibWFuYWdlLWFjY291bnQiLCJtYW5hZ2UtYWNjb3VudC1saW5rcyIsInZpZXctcHJvZmlsZSJdfX0sInNjb3BlIjoib3BlbmlkIHByb2ZpbGUgZW1haWwiLCJlbWFpbF92ZXJpZmllZCI6dHJ1ZSwibmFtZSI6IlRlc3QgVXNlciIsInByZWZlcnJlZF91c2VybmFtZSI6InRlc3R1c2VyIiwiZ2l2ZW5fbmFtZSI6IlRlc3QiLCJmYW1pbHlfbmFtZSI6IlVzZXIiLCJlbWFpbCI6InRlc3R1c2VyQGV4YW1wbGUuY29tIn0.JNPv_mTbmTMbT5oemQIk1ceqmKfb54CF3sHlSMb_2WfJh1YJn83pxBgJdpSdCIOvhbxS-BdWfq-G9kWuzhLfzL97WMQ0EX1wX05S0NoxugmhSwHHREdc_xmCO8AFtU-21D03cdm9oxHve69h-ci1yVbBIK0PZEN6Z68l3wcQA3Tor61GtFqenpiCZAZ3dY2oFHhKAwizDzVhKYoHK7JvhLmhUeEZooUwur1pkxggL1eF37s1m5x0__wQorHCwDE7K2DUFOWHTHvyoubIYT_usapkL0L6ZaE6E7C76rxuHzyUcH8evXuPjy_QYk63Fj6A4qxO5zGSwIxHAal3v4yJig",
  "expires_in": 69,
  "refresh_expires_in": 0,
  "token_type": "Bearer",
  "not-before-policy": 0,
  "session_state": "NX3LhjvQz7rSptY4c0yIe7jD",
  "scope": "openid profile email",
  "issued_token_type": "urn:ietf:params:oauth:token-type:access_token",
  "account-link-url": "https://04f7-81-240-46-212.ngrok-free.app/keycloak/realms/demo-mcp-servers/broker/demo-users/link?nonce=31a62c62-ee43-4126-9d39-d881b10b0e8a&hash=_EvemeK81o16WWLKmoVgFpNjKXZE_ckskHAFY_WBK_g&client_id=token-exchange"
}
The Keycloak Setup#
When I first looked at Dynamic Client Registration, I hesitated. The idea of allowing clients to register themselves in Keycloak felt risky, what’s stopping a malicious client from requesting broad scopes and accessing my existing resources?
In theory, OAuth 2.0 provides mechanisms to prevent this: scopes limit what a token can do, audiences specify which resources accept a token, and Keycloak’s client policies can restrict what DCR clients are allowed to request.
But here’s the reality: how many of your existing resource servers actually validate audiences? In my experience, many applications only check whether the token signature is valid, the issuer is trusted, and the token hasn’t expired. Scope and audience validation is often incomplete or missing entirely.
This creates a real risk. If DCR is enabled in my main realm, a malicious client could register itself, request scopes that exist in the system, and obtain tokens that my resource servers would happily accept.
To mitigate this, I chose a separate realm dedicated to MCP servers.
My Keycloak setup consists of two realms.
- demo-mcp-servers (dedicated to MCP client registrations via DCR)
- demo-users (Contains my existing users and regular application clients)
With this separation, tokens issued in the MCP realm have a different issuer. Even if a malicious client registers via DCR and obtains broad scopes, those tokens are fundamentally incompatible with my existing resources, the issuer simply won’t match.
Is this strictly necessary? If your resource servers properly validate audiences and scopes, probably not. But in a landscape where you’re not 100% certain of every application’s token validation logic, realm separation provides an additional security boundary.
There’s a practical challenge with this setup: users need to authenticate when connecting an MCP server, but my users live in demo-users, not demo-mcp-servers.
To solve this, I configured an Identity Provider in the MCP realm that federates to my users realm.
This allows existing users to authenticate while keeping client registrations isolated.
Finally, I configured Token Exchange between the realms. When Claude calls our MCP server, it presents a token issued by demo-mcp-servers.
But our temperature resource server only accepts tokens from demo-users.
The MCP server exchanges its incoming token for one that will be accepted by the temperature resource server.
Configure the Realms#
- Create a new realm called
demo-mcp-servers - Create a new realm called
demo-users - Create a new user in the
demo-usersrealm with the usernametestand the passwordchangeme
Configure the Dynamic Client Registration#
So, the next step is configuring DCR.
Navigate to your MCP servers realm demo-mcp-servers and go to Clients -> Client Registration
Two policies need adjustment:
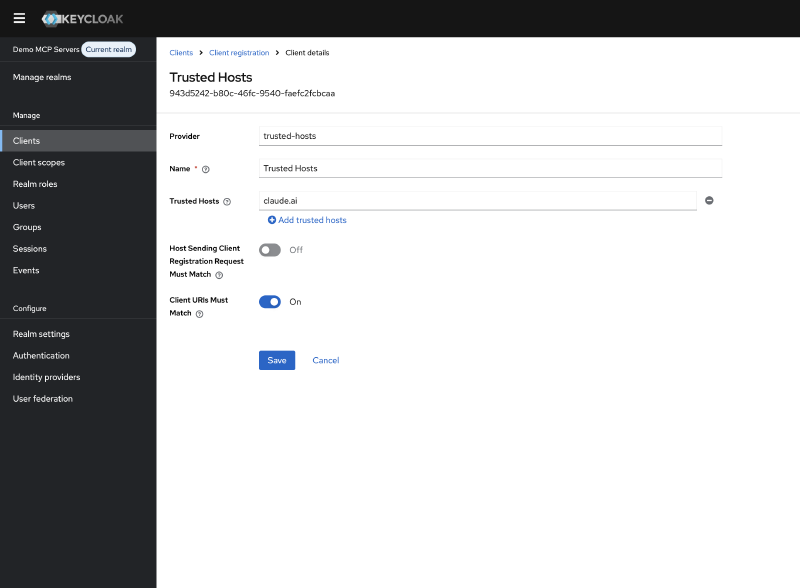
Trusted Hosts#
By default, Keycloak restricts which hosts can register clients. Since Claude is currently the only MCP client I want to allow, I configured it to trust only Anthropic’s domain:
Allowed Client Scopes#
Keycloak also restricts which scopes a dynamically registered client can request.
I configured the allowed scopes to match what Claude needs: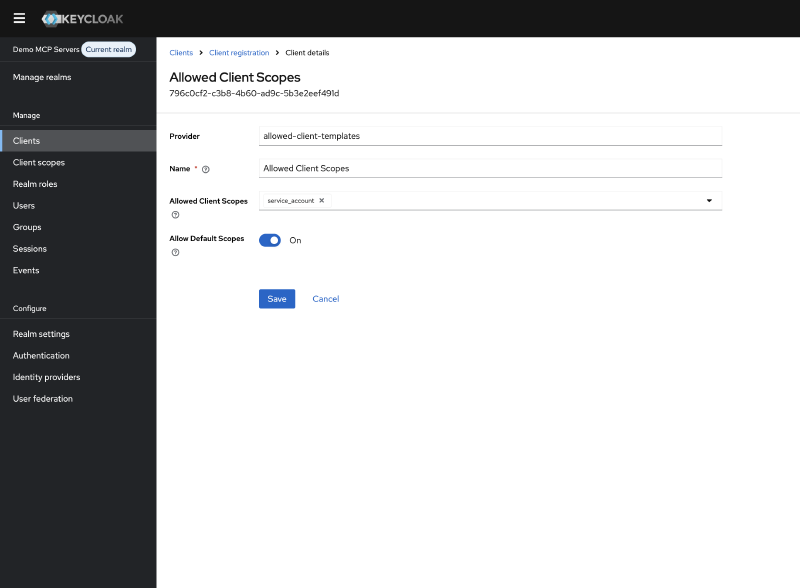
Client Scopes#
In the left menu, navigate to Client Scopes and create a new scope called openid.
Set the scope type to Optional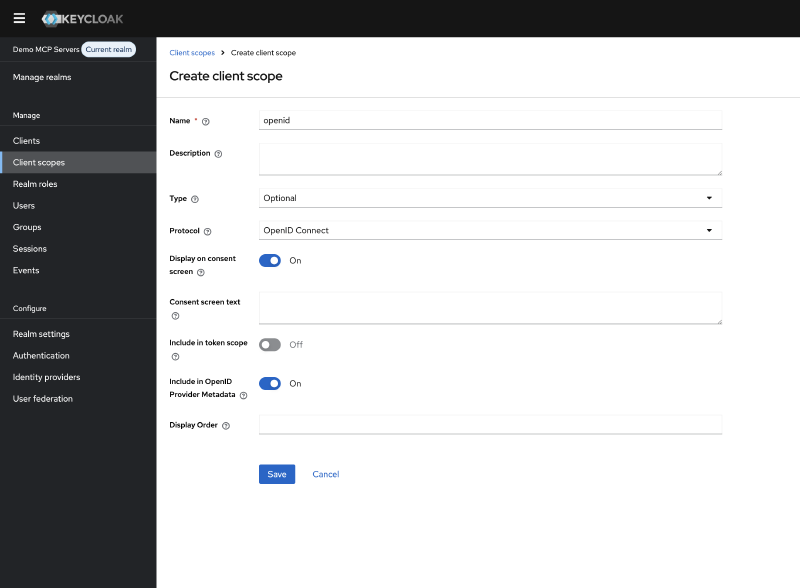
Your configuration will depend on which MCP clients you need to support. You could disable these policies entirely to allow any client to register with any scope, but this is not recommended.
Note: If you encounter errors during client registration, always check the Keycloak server logs. The error messages in the registration response are often generic, but the server logs contain the actual reason for rejection.
Configuring Token Exchange#
Our MCP server receives tokens issued by the demo-mcp-servers realm, but needs to call the temperature resource server which only accepts tokens from demo-users.
This is where Internal-to-External Token Exchange comes in.
Internal-to-External Token Exchange allows a client in one realm to exchange a token for one issued by a different realm (or external identity provider). The authorization server validates the incoming token, verifies the client is permitted to perform the exchange, and issues a new token with the appropriate issuer and audience for the target realm.
Token Exchange is not enabled by default. To activate it, configure the following features when starting Keycloak:
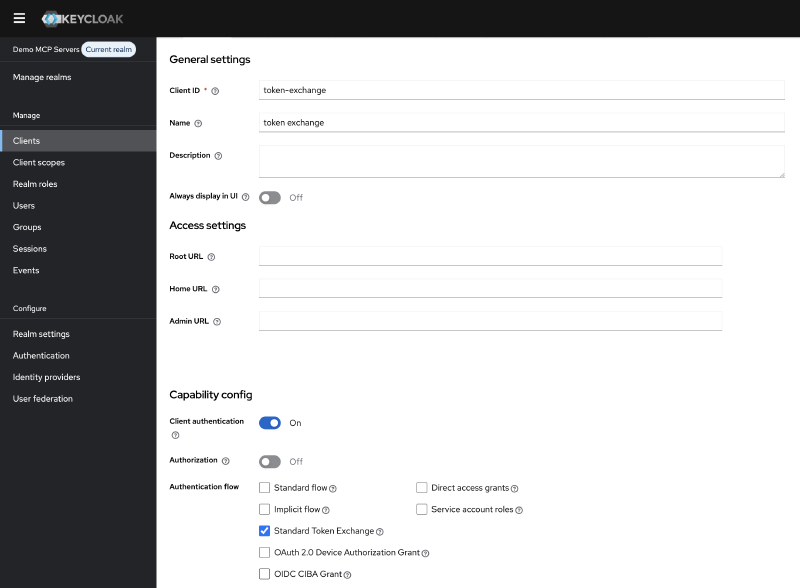
KC_FEATURES: token-exchange,admin-fine-grained-authz:v1With these features enabled, create a new client in the demo-mcp-servers realm. For this demo, I named it token-exchange.
Configure the client as follows:
- Enable
Client Authentication - Enable
Standard Token Exchangein the client settings - Generate a
client secretunder the Credentials tab
This client will be used by your MCP server to exchange incoming tokens for ones that the temperature resource server will accept.
Configuring the Identity Provider#
For Token Exchange to work between realms, we need to establish a trust relationship.
In Keycloak, this is done by configuring the demo-users realm as an Identity Provider in the demo-mcp-servers realm.
Creating the Broker Client#
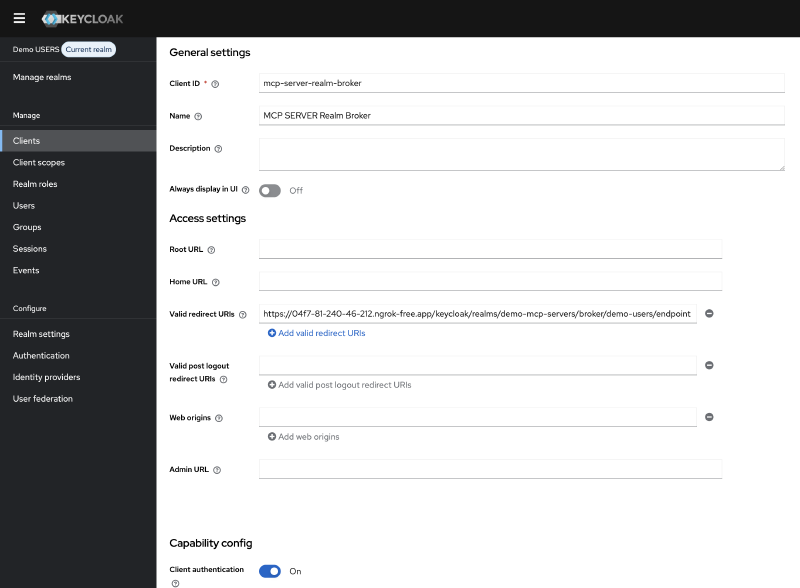
First, create a client in the demo-users realm that the Identity Provider will use to communicate. I named it mcp-server-realm-broker.
Configure this client with:
- Client authentication: Enabled
- Standard Flow: Enabled
- Valid redirect URIs: https://your-keycloak/realms/demo-mcp-servers/broker/demo-users/endpoint
- Generate a client secret under the Credentials tab
Keep the client secret available, you’ll need it in the next step.
Creating the Identity Provider#
Navigate to Identity Providers in the demo-mcp-servers realm and add a new Keycloak OpenID Connect provider.
Configure it with:
- Alias: demo-users (this identifier is used in token exchange requests as the requested_issuer parameter)
- Discovery URL: Point to your demo-users realm’s well-known endpoint, for example: https://your-keycloak/realms/demo-users/.well-known/openid-configuration
- Client ID: mcp-server-realm-broker
- Client Secret: The secret you generated in the previous step
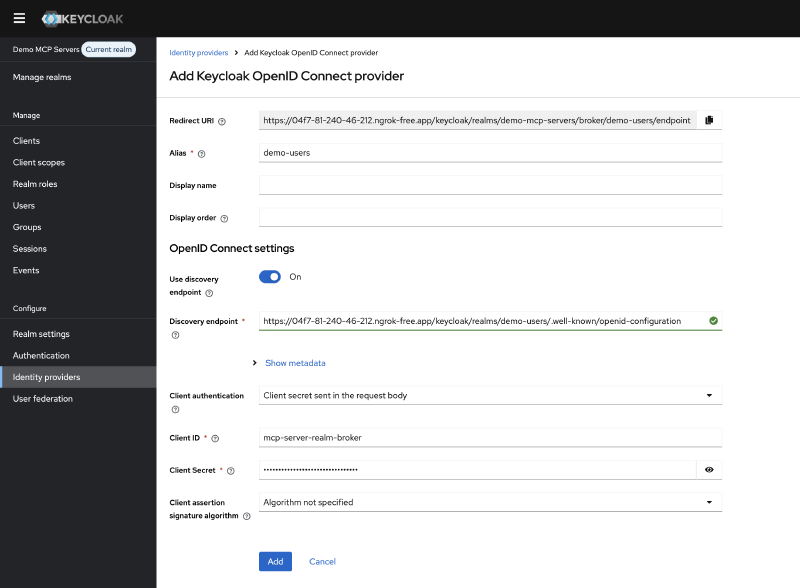
Keycloak will automatically populate the authorization and token endpoints from the discovery document.
With the Identity provider created, scroll down to Advanced settings and enable Store tokens and Stored tokens readable, then click Save
Scroll back up and navigate to Permissions and enable permissions.
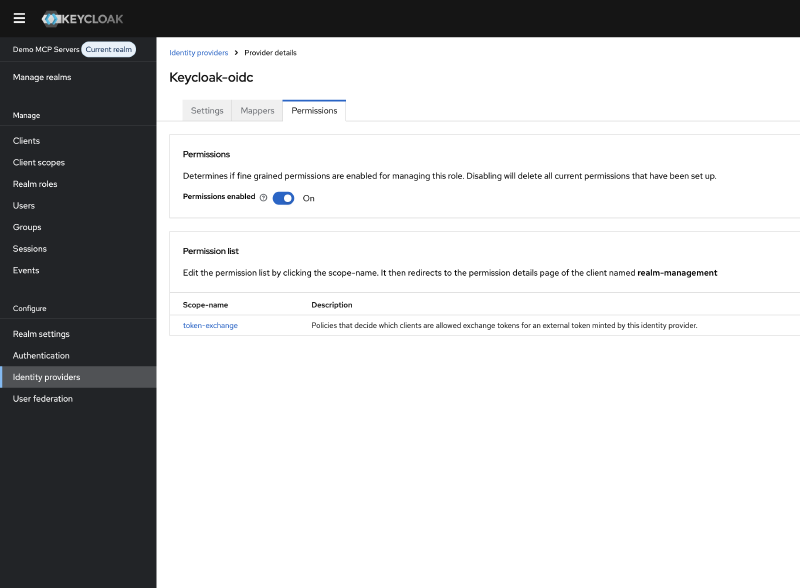
Open the permission with scope name token-exchange.
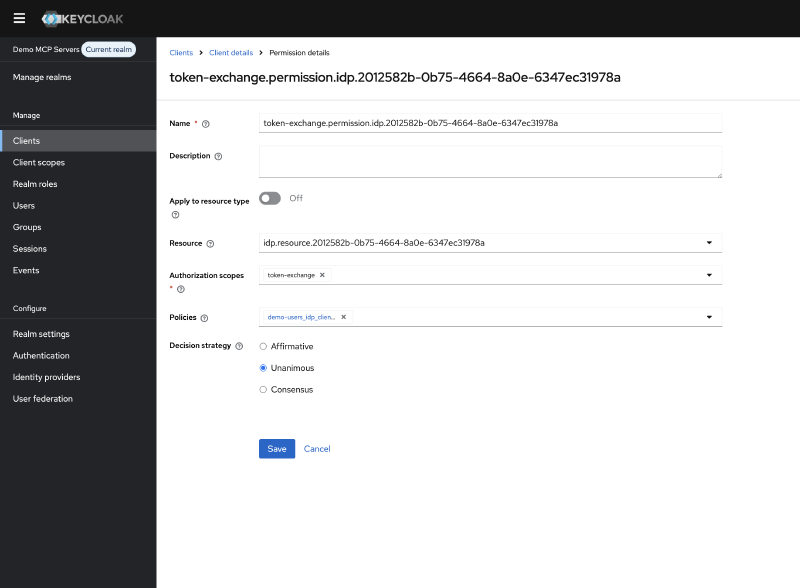
Click on Create Policy next to the Policies and choose Client as the policy type.
Fill in a name for the policy, for example token-exchange-policy.
And under clients select the token-exchange client you created earlier.
Go Back to the Identity Providers -> demo-users -> Permissions -> token-exchange
And verify that the policy is listed under Policies. Otherwise, you’ll need to assign the policy.
The MCP Server Setup#
With Keycloak configured, let’s build the Spring Boot MCP server. This server will expose MCP tools to AI clients like Claude, perform token exchange when calling downstream services.
I created a new Spring Boot application with the following dependencies:
<dependency>
    <groupId>org.springframework.boot</groupId>
    <artifactId>spring-boot-starter-webflux</artifactId>
</dependency>

<dependency>
    <groupId>org.springframework.ai</groupId>
    <artifactId>spring-ai-starter-mcp-server-webmvc</artifactId>
</dependency>

<dependency>
    <groupId>org.springaicommunity</groupId>
    <artifactId>mcp-server-security</artifactId>
    <version>0.1.1</version>
</dependency>

<dependency>
    <groupId>org.springframework.boot</groupId>
    <artifactId>spring-boot-starter-security</artifactId>
</dependency>

<dependency>
    <groupId>org.springframework.boot</groupId>
    <artifactId>spring-boot-starter-oauth2-resource-server</artifactId>
</dependency>
The security configuration is straightforward thanks to the mcp-server-security library:
@Configuration
@EnableWebSecurity
public class McpServerSecurityConfig {

    @Bean
    public SecurityFilterChain securityFilterChain(@Value("${issuer-uri}") String issuerUri, HttpSecurity http) {
        return http
                .authorizeHttpRequests(authorize -> {
                    authorize.anyRequest().authenticated();
                })
                .cors(Customizer.withDefaults())
                .csrf(AbstractHttpConfigurer::disable)
                .with(
                        McpServerOAuth2Configurer.mcpServerOAuth2(),
                        (mcpAuthorization) -> {
                            mcpAuthorization.authorizationServer(issuerUri);
                        }
                )
                .build();
    }
}
The actual MCP tool, it calls our temperature resource server and returns the result:
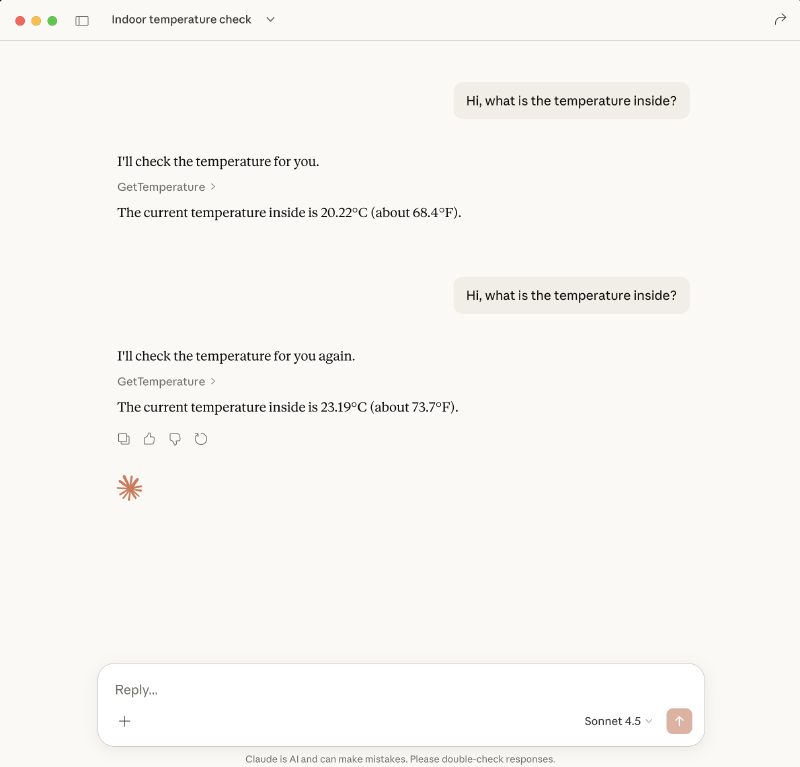
@Tool
public String getTemperature() {
    String temperature = temperatureClient.getTemperature();
    log.info("Temperature {}", temperature);
    return temperature;
}
The interesting part is how we authenticate with the temperature resource server.
Remember, the incoming token is issued by demo-mcp-servers, but the resource server only accepts tokens from demo-users.
To solve this, I created a client that performs Internal-to-External token exchange before calling the resource server:
@Component
public class TokenExchangeClient {

    private final RestClient restClient;
    private final String clientId;
    private final String clientSecret;

    public TokenExchangeClient(@Qualifier("tokenExchangeRestClient") RestClient restClient,
                               @Value("${token-exchange.client_id}") String clientId,
                               @Value("${token-exchange.client_secret}") String clientSecret) {
        this.restClient = restClient;
        this.clientId = clientId;
        this.clientSecret = clientSecret;
    }

    public TokenExchangeResponse tokenExchange(String subjectToken) {
        MultiValueMap<@NonNull String, String> formData = new LinkedMultiValueMap<>();
        formData.add("grant_type", "urn:ietf:params:oauth:grant-type:token-exchange");
        formData.add("client_id", clientId);
        formData.add("client_secret", clientSecret);
        formData.add("subject_token", subjectToken);
        formData.add("subject_token_type", "urn:ietf:params:oauth:token-type:access_token");
        formData.add("requested_token_type", "urn:ietf:params:oauth:token-type:access_token");
        formData.add("requested_issuer", "demo-users");

        return restClient.post()
                .uri("/protocol/openid-connect/token")
                .contentType(MediaType.APPLICATION_FORM_URLENCODED)
                .body(formData)
                .retrieve()
                .body(TokenExchangeResponse.class);
    }

    public record TokenExchangeResponse(
            @JsonProperty("access_token") String accessToken,
            @JsonProperty("expires_in") int expiresIn,
            @JsonProperty("refresh_expires_in") int refreshExpiresIn,
            @JsonProperty("token_type") String tokenType,
            @JsonProperty("not-before-policy") int notBeforePolicy,
            @JsonProperty("session_state") String sessionState,
            @JsonProperty("scope") String scope,
            @JsonProperty("issued_token_type") String issuedTokenType,
            @JsonProperty("account-link-url") String accountLinkUrl
    ) {}
}
During testing with Claude, I discovered an issue:
Claude requests the /.well-known/oauth-authorization-server to the MCP server itself. If this fails, Claude attempts to register the client directly with the MCP server instead of the authorization server.
As a workaround, I added an endpoint that proxies the discovery request to Keycloak:
This endpoint shouldn’t be necessary, according to the MCP specification, but it resolves the client registration issue with Claude. Ideally, the MCP client should follow the issuer from the server metadata to discover the authorization server.
@RestController
public class ConfigController {

    @Value("${issuer-uri}")
    private String issuerUri;

    private final RestClient restClient = RestClient.create();

    @GetMapping("/.well-known/oauth-authorization-server")
    public ResponseEntity<@NonNull String> config() {
        String metadataUrl = issuerUri + "/.well-known/oauth-authorization-server";

        String response = restClient.get()
                .uri(metadataUrl)
                .retrieve()
                .body(String.class);

        return ResponseEntity.ok()
                .contentType(MediaType.APPLICATION_JSON)
                .body(response);
    }
}
The Temperature Resource Server#
The temperature resource server is intentionally simple.
It’s a standard Spring Boot OAuth 2.0 resource server that returns a random temperature.
The purpose here is to demonstrate that this server only accepts tokens issued by the demo-users issuer.
@RestController
@RequestMapping("/temperature")
public class TemperatureController {

    private static final Logger log = LoggerFactory.getLogger(TemperatureController.class);

    @GetMapping
    @ResponseStatus(HttpStatus.OK)
    double getTemperature() {
        double temperature = 18 + (Math.random() * 16);
        temperature = Math.round(temperature * 100.0) / 100.0;
        log.info("Temperature {}", temperature);
        return temperature;
    }

}
The security configuration is a standard OAuth 2.0 resource server setup:
@Configuration
@EnableWebSecurity
public class SecurityConfig {

    @Bean
    public SecurityFilterChain securityFilterChain(HttpSecurity http) {
        http.authorizeHttpRequests(authorize -> {
            authorize.requestMatchers(HttpMethod.GET, "/temperature").authenticated();
            authorize.anyRequest().denyAll();
        });
        http.oauth2ResourceServer(oauth2 -> {
            oauth2.jwt(Customizer.withDefaults());
        });
        http.csrf(AbstractHttpConfigurer::disable);
        http.cors(Customizer.withDefaults());
        return http.build();
    }
}
Testing the Setup#
To test the complete flow, I used ngrok to expose the MCP server, temperature resource server, and Keycloak to the internet.
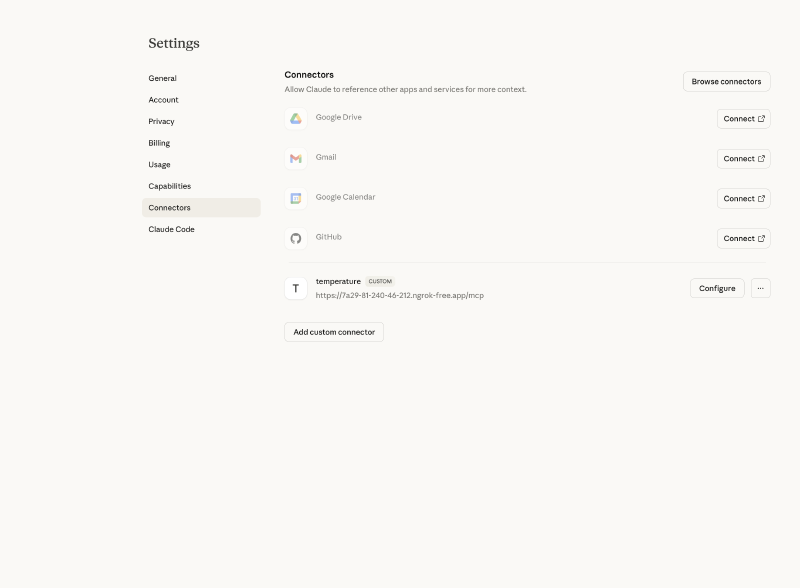
In Claude, I added a new MCP server connection with the ngrok URL:
https://7a29-81-240-46-212.ngrok-free.app/mcp
Conclusion#
With this setup, I was able to secure my MCP server using Keycloak and call downstream resources that only accept tokens from my existing users realm. This approach works without modifying your existing infrastructure.
However, I want to be honest about the trade-offs.
The separate realm feels like overhead. It adds complexity: an extra realm to maintain, Identity Provider federation to configure, and advanced token exchange to implement. For a demo this is manageable, but in production it’s another moving part that can break. The token exchange isn’t quite right. With Internal-to-External exchange, I lose fine-grained control over audiences and scopes. The exchanged token inherits what the Identity Provider federation allows, not exactly what I need for a specific resource. A more refined approach might involve an API gateway that performs Internal-to-Internal exchange with precise audience and scope targeting.
The real solution? Properly secure your existing resources. Validate audiences. Check scopes. If every resource server correctly validates these claims, you don’t need realm separation. You can enable DCR in your main realm with proper client policies, and tokens will only work where they’re supposed to.
But let’s be realistic: in many organizations, retrofitting audience and scope validation across all existing services is a significant undertaking. Legacy applications, third-party integrations, and time constraints often make this impractical. In those cases, realm separation provides a pragmatic security boundary while you work toward a more robust long-term solution. This setup isn’t perfect, but it’s a starting point. As MCP adoption grows and best practices emerge, I expect the security patterns will mature as well.
Extra#
If you want to try this out yourself, you can find the complete source code on GitHub. The repository includes:
- A Spring Boot MCP server
- A temperature resource server
- A docker compose file to start everything together
- Terraform code to configure the Keycloak server
- A README with step-by-step instructions to get everything running