Passwords are the weakest link in authentication. Passkeys are offering a passwordless future that’s more secure and more user-friendly.
- Introduction
- What Are Passkeys?
- Why Passkeys Matter
- Starting Keycloak Locally
- Configure Terraform Provider
- Configure the Realm
- Configure the Client
- Configure the Registration Flow
- Configure the Sign In Flow
- UI Configuration Alternative
- Test it Out
- Conclusion
Introduction#
The wait is over! Keycloak 26.4.0 has officially moved passkeys from preview to production-ready status. This milestone marks a significant step forward in authentication security, making it easier than ever to implement true passwordless authentication in your applications.
In this comprehensive guide, I’ll show you how to configure Keycloak 26.4.0 for passwordless authentication using passkeys with Infrastructure as Code via Terraform.
What Are Passkeys?#
Passkeys are a modern, passwordless authentication method built on the FIDO2 and WebAuthn standards. Think of them as a replacement for passwords that’s both more secure and more convenient.
How Passkeys Work#
When you create a passkey:
- Key Pair Generation: Your device generates a unique cryptographic key pair (public and private keys)
- Private Key Storage: The private key never leaves your device - it’s stored securely in your device’s hardware (TPM, Secure Enclave, etc.)
- Public Key Registration: Only the public key is sent to the server (in this case, Keycloak)
- Biometric Protection: Access to the private key is protected by biometrics (Face ID, Touch ID, Windows Hello) or a device PIN
The FIDO2 Advantage#
FIDO2 (Fast Identity Online) is an open authentication standard developed by the FIDO Alliance and the W3C. It consists of two key components:
- WebAuthn: The browser API that enables passwordless authentication
- CTAP2 (Client to Authenticator Protocol): Enables communication with external authenticators like security keys
This means passkeys work with:
- Built-in authenticators: Fingerprint sensors, facial recognition, Windows Hello
- External authenticators: YubiKeys, Titan Security Keys, and other FIDO2-compatible devices
- Platform authenticators: iCloud Keychain, Google Password Manager, Windows Hello
Why Passkeys Matter#
Security Benefits#
- Phishing-Resistant: Passkeys are cryptographically bound to the specific domain, making phishing attacks virtually impossible
- No Shared Secrets: Unlike passwords, the server never knows your private key - nothing to steal in a breach
- No Password Reuse: Each passkey is unique to the service, eliminating credential stuffing attacks
- Brute-Force Proof: There’s nothing to guess or crack - no weak passwords, no dictionary attacks
User Experience Benefits#
- Faster Login: Authentication takes seconds - just a fingerprint or face scan
- Nothing to Remember: No more “forgot password” flows or password managers
- Cross-Platform: Passkeys sync across your devices through platform providers (Apple, Google, Microsoft)
- Consistent Experience: Same authentication method across all your devices
Statistics Worth Noting#
According to recent industry reports:
- 60% of data breaches involve stolen or weak passwords
- Passkeys are 40% faster than traditional password authentication
- Google reported 4x fewer account takeovers after implementing passkeys
- Major adoption: Apple, Google, Microsoft, and Amazon all support passkeys
Starting Keycloak Local#
I just wrote this small docker-compose file to start Keycloak locally. Do not use this in production - it’s configured for development only.
services:
  postgres:
    image: postgres:15
    container_name: keycloak-db
    restart: always
    environment:
      POSTGRES_DB: keycloak
      POSTGRES_USER: keycloak
      POSTGRES_PASSWORD: keycloak
    volumes:
      - keycloak_data:/var/lib/postgresql/data

  keycloak:
    image: quay.io/keycloak/keycloak:26.4
    container_name: keycloak
    command:
      - start-dev
    environment:
      KC_DB: postgres
      KC_DB_URL: jdbc:postgresql://postgres:5432/keycloak
      KC_DB_USERNAME: keycloak
      KC_DB_PASSWORD: keycloak

      KC_BOOTSTRAP_ADMIN_USERNAME: admin
      KC_BOOTSTRAP_ADMIN_PASSWORD: admin

      KC_HOSTNAME: localhost
    ports:
      - "8080:8080"
    depends_on:
      - postgres

volumes:
  keycloak_data:
Start Keycloak with docker-compose up -d
Access the admin console at http://localhost:8080/admin (admin/admin).
Configure Terraform Provider#
Create a file provider.tf:
terraform {
  required_providers {
    keycloak = {
      source = "keycloak/keycloak"
      version = "5.5.0"
    }
  }
}

provider "keycloak" {
  client_id     = "admin-cli"
  username      = "admin"
  password      = "admin"
  url           = "http://localhost:8080"
}
Configure the Realm#
Create your Keycloak realm:
resource "keycloak_realm" "realm" {
  realm                          = "demo"
  registration_allowed           = true
  login_with_email_allowed       = true
  duplicate_emails_allowed       = false
  registration_email_as_username = true
}
Configure the Client#
Set up your OpenID Connect client application:
resource "keycloak_openid_client" "openid_client" {
  realm_id  = keycloak_realm.realm.id
  client_id = "fc15df10-a503-4a4a-98ea-9dc06fc2d87a"

  name    = "demo-client"
  enabled = true

  access_type         = "PUBLIC"
  valid_redirect_uris = ["https://www.keycloak.org/app/?url=http://localhost:8080&realm=demo&client=fc15df10-a503-4a4a-98ea-9dc06fc2d87a"]
  web_origins         = ["https://www.keycloak.org/app/?url=http://localhost:8080&realm=demo&client=fc15df10-a503-4a4a-98ea-9dc06fc2d87a"]

  login_theme           = "keycloak"
  standard_flow_enabled = true
}
Configure the Registration Flow#
This is where the magic happens. We configure a custom registration flow that requires users to set up a passkey during registration:
resource "keycloak_authentication_flow" "registration_passwordless" {
  realm_id    = keycloak_realm.realm.id
  alias       = "passwordless registration"
  description = "Passwordless registration flow"
  provider_id = "basic-flow"
}


resource "keycloak_authentication_subflow" "passwordless_step" {
  realm_id          = keycloak_realm.realm.id
  parent_flow_alias = keycloak_authentication_flow.registration_passwordless.alias

  alias         = "passwordless registration form"
  provider_id   = "form-flow"
  authenticator = "registration-page-form"
  requirement   = "REQUIRED"
}


resource "keycloak_authentication_execution" "user_creation" {
  realm_id          = keycloak_realm.realm.id
  parent_flow_alias = keycloak_authentication_subflow.passwordless_step.alias

  authenticator = "registration-user-creation"
  requirement   = "REQUIRED"
  priority      = 0
}

resource "keycloak_authentication_bindings" "registration_flow_realm_bindings" {
  realm_id          = keycloak_realm.realm.id
  registration_flow = keycloak_authentication_flow.registration_passwordless.alias
}

resource "keycloak_required_action" "webauthn_register_passwordless" {
  realm_id       = keycloak_realm.realm.id
  alias          = "webauthn-register-passwordless"
  name           = "Webauthn Register Passwordless"
  enabled        = true
  default_action = true
}
Configure the Sign In Flow#
Now configure the sign in flow:
resource "keycloak_authentication_flow" "sign_in_passwordless" {
  realm_id    = keycloak_realm.realm.id
  alias       = "passwordless sign in"
  description = "Passwordless sign in flow"
  provider_id = "basic-flow"
}


resource "keycloak_authentication_subflow" "sign_in_step" {
  realm_id          = keycloak_realm.realm.id
  parent_flow_alias = keycloak_authentication_flow.sign_in_passwordless.alias

  alias       = "passwordless sign in subflow"
  provider_id = "basic-flow"
  requirement = "REQUIRED"
}


resource "keycloak_authentication_execution" "passwordless_webauthn_execution" {
  realm_id          = keycloak_realm.realm.id
  parent_flow_alias = keycloak_authentication_subflow.sign_in_step.alias

  authenticator = "webauthn-authenticator-passwordless"
  requirement   = "REQUIRED"
  priority      = 0
}


resource "keycloak_authentication_bindings" "browser_flow_realm_bindings" {
  realm_id     = keycloak_realm.realm.id
  browser_flow = keycloak_authentication_flow.sign_in_passwordless.alias
}
UI Configuration Alternative#
If you prefer to configure Keycloak through the Admin UI instead of using Terraform, follow these detailed steps. This approach is useful for learning, testing, or when Terraform isn’t available in your workflow.
Create a new realm and client#
Create a Realm:
- Log in to the Keycloak Admin Console at
http://localhost:8080 - Click the realm dropdown in the top-left corner (it says “Keycloak” by default)
- Click Create Realm
- Set the Realm name to
demo(or your preferred name) - Enable User registration under the Login tab
- Configure Email as username and disable Duplicate emails if desired
- Click Create
- Log in to the Keycloak Admin Console at
Create a Client:
- Navigate to Clients in the left sidebar
- Click Create client
- Set Client type to
OpenID Connect - Enter a Client ID (e.g.,
fc15df10-a503-4a4a-98ea-9dc06fc2d87a) - Click Next
- Enable Standard flow (Authorization Code Flow)
- Set Access type to
Public(for frontend applications) - Click Save
- In the client settings, add your application’s URL to Valid redirect URIs (e.g.,
https://www.keycloak.org/app/?url=http://localhost:8080&realm=demo&client=fc15df10-a503-4a4a-98ea-9dc06fc2d87a) - Add the same URL to Web origins for CORS support
Create new flows#
Navigate to the realm’s Authentication tab and create a new Registration Flow and a new Sign In Flow.
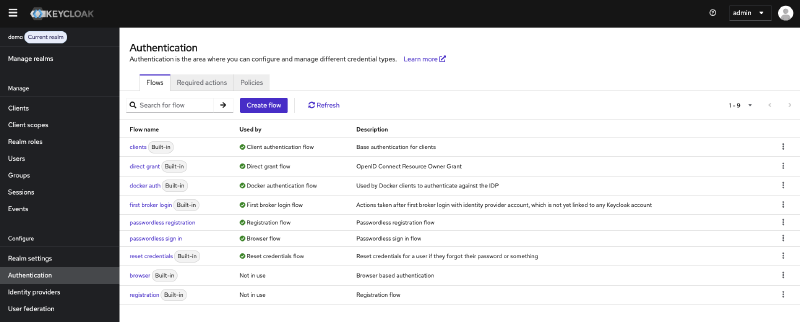
Create a new flow for registration#
- Click the Flows tab in the Authentication section
- Click Create flow
- Configure the registration flow:
- Name:
passwordless registration - Description:
Passwordless registration flow - Top level flow type:
Basic flow
- Name:
- Click Create
- In your new flow, click Add a sub-flow
- Fill in a name and select Form as the flow type
- Mark this flow as Required
- In the form subflow, click +-Sign and select Add execution
- Select Registration User Profile Creation and click Add
- Mark this step as Required

Bind the registration flow:
- Go to the Bind flow tab at the top
- Change the dropdown to Registration flow
- Click Save
Create a new flow for sign in#
- Return to the Flows tab
- Click Create flow again
- Configure the sign in flow:
- Name:
passwordless sign in - Description:
Passwordless sign in flow - Top level flow type:
Basic flow
- Name:
- Click Create
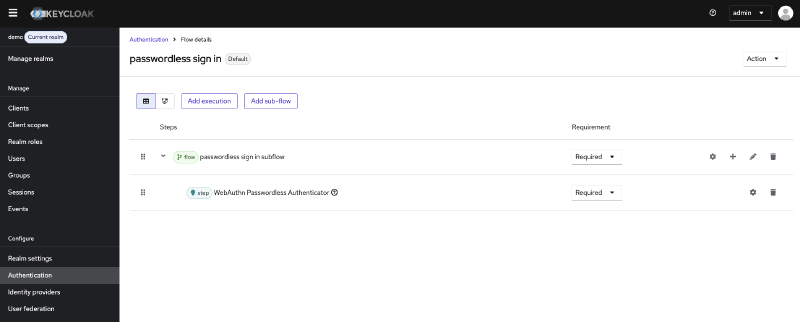
- In your new flow, click Add a sub-flow
- Fill in a name and select Generic as the flow type
- Mark this flow as Required
- In the generic subflow, click +-Sign and select Add execution
- Select WebAuthn Passwordless Authenticator and click Add
- Mark this step as Required
Bind the sign in flow:
- Go to the Bind flow tab at the top
- Change the dropdown to Browser flow
- Click Save
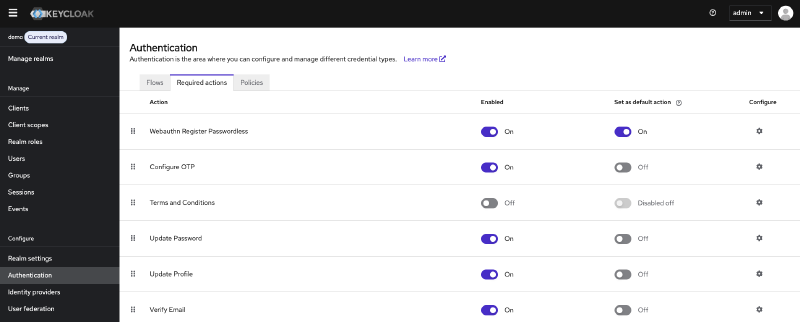
Enable default required actions#
- Navigate to Authentication → Required actions tab
- Find Webauthn Register Passwordless in the list
- Enable the following checkboxes:
- Enabled: Makes the action available
- Default action: Automatically prompts new users to register a passkey during their first login
Test it Out#
Open your browser and navigate to https://www.keycloak.org/app/. You should see a page where you can configure your test setup.
Fill in the realm and client details, and click Save.
Conclusion#
Keycloak 26.4.0’s production-ready passkey support marks a turning point in authentication security. With passkeys now out of preview, there’s no reason to delay implementing passwordless authentication in your applications.
The combination of Keycloak’s robust authentication platform and Terraform’s Infrastructure as Code approach gives you:
✅ Reproducible deployments across environments
✅ Version-controlled configuration for audit and rollback
✅ Enterprise-grade security with industry standards
✅ Excellent user experience with fast, modern authentication
✅ Future-proof architecture aligned with industry direction